When connecting a camera to NCS the displayed frame rate FPS can sometimes be low compared to what the camera can deliver. This short guide will show how to adjust that. Also, what can I do if the FPS significantly drops when motion detection is running.
When adding the camera with the tab for ONVIF Source use correct Profile
Adding a camera supporting the ONVIF standard is easy. However, there are a couple of things you still need to know to get what you want.
After a click on Browse, enter credentials and login to the camera there should be a couple of Profiles to choose from. Depending on camera there are usually profiles called Jpeg, Mjpeg and rtsp.
Jpeg: is camera quality, no compression of image, slow FPS (usually 1 fps).
Mjpeg: sends many high quality jpeg images to get a high FPS. No compression, but the quality can often be adjusted in the camera. Use a little bit more bandwidth on the LAN, but less cpu power.
Rtsp: a format that includes both video and audio. Can be high resolution and high FPS depending on the camera. Video is compressed, use less bandwidth, use more cpu power for the decoding.
Test the different formats and see what works best. If you login to the camera usually all these parameters can be fine-tuned.
Adjust settings in Netcam Studio to increase FPS
Start NCS X and add a camera. In the bottom right corner of the image you can read a value of Frames Per Second (FPS). That is now probably around 10 FPS: The camera can usually deliver much more than that like 25 or 30 FPS or maybe even more.
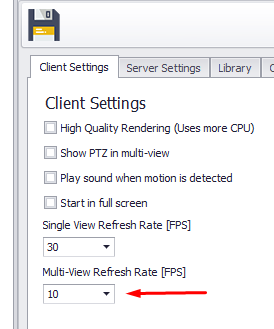
NCS X can be seen as the NCS Service + NCS Windows client in one application. Therefore, the User Interface, GUI, in NCS X should be treated as the windows client. To change the FPS go to Settings-Client Settings. When adding a camera the GUI is by default in Multi-View even if only one camera is connected. In the settings the default value for Multi-View Refresh Rate is set to 10 FPS. Change that to 20, 25 or 30 FPS and Save and you will have what the camera can deliver. This value is then valid for all cameras.

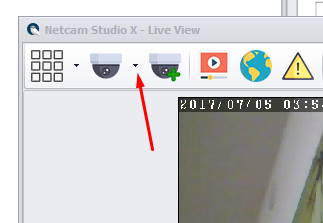
To get a high FPS just for the actual camera without the changes above go to the Single View mode by clicking here and select the source.

Now the background will turn to white. In Multi View that background was black. In this mode the FPS is set to 30 FPS by default, but can be changed with the Single View Refresh Rate as in the first figure. This setting is valid when only one camera is shown.
Be setting a high FPS as default for the Multi-View Refresh Rate all cameras will show a high FPS. This will certainly affect the CPU usage to a higher value. If you use several high resolution cameras a high FPS will certainly result in a high CPU usage so beware of that.
If FPS significantly drops when motion detection is running
When motion detection is running both the hardware in camera and NCS is working. If the FPS is dropping during motion detection and the resulting video gets lagging turn to the settings in the camera. If the target that you want to detect is big and moving relatively quick it puts high demands on the hardware in the camera. Mostly the cameras today with high resolution use the compression h.264 to decrease data traffic. If the object is big and changes rapidly the h.264 do a lot of calculations and therefore use a lot of processing power. If the hardware in the camera is not dimensioned for that most likely the frame rate from the camera will drop. This can be seen in the FPS from the camera and probably the resulting video will behave strangely. To help the camera and NCS for a better result go to the configuration of the camera and change parameters like quality, CBR, bit rate etc. Test these parameters and see if it will be better. Another solution might be to connect to the camera with MJPEG if the camera support that. MJPEG mode will increase data traffic, but decrease the need for calculations. Test what works best in you application.
Set the FPS of the recorded video
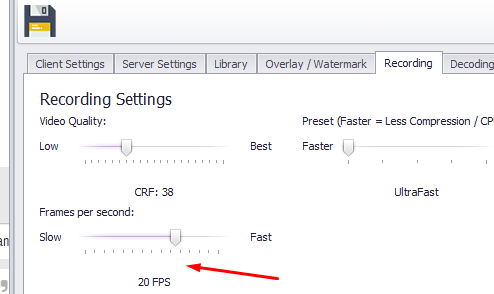
When working with the settings above it is also important to know that the FPS for the recorded video can be set.
here

The default value is set to 20 FPS which is fine in most applications, but can be changed.
Remember that all these settings apart from in the camera will affect the CPU usage and finally the CPU load. So if you have demanding applications you will most likely need a computer with a high end processor.